Detail of AssetMode Interface
Main Interface Panel of AssetMode
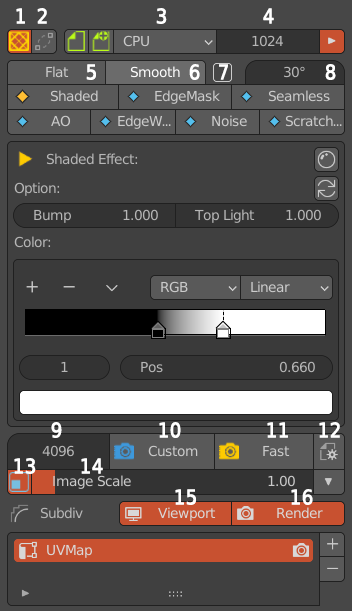
Fig. 31 Main interface panel of assetMode
1.Exit AssetMode and return to layer channel status.
2.Rebuild the connection between the baked object and the original object.
3.The device used for window preview.
4.The window previews the number of samples.
5.The model is colored with Flat.
6.The model is shaded using Smooth.
7.Enable the automatic smoothing function.
8.Automatically smooth angles.
9.Samples of render graph.
10.Use the custom samples of render(9) to render the image.。
11.Use the fastest samples of render (the render result is not exquisite, except for Shaded Effect).
12.AssetMode option panel。
13.The image switch displayed on the 3D window。
14.The scale of the image displayed on the 3D window。
15.Subdiv modifier effect switch when viewport preview。
16.Subdiv modifier effect switch when render 。
Shaded Effect

Fig. 32 Shaded Effect panel
1.Open the material editor.
2.Reset to the default value.
Bump: Strengthen the light and shadow effect of the concave and convex of the model.
Top Light: Strengthen the light and shadow effect in the vertical direction of the model.
Color: Set the color of the light and shadow gradient change.
EdgeMask_Effect
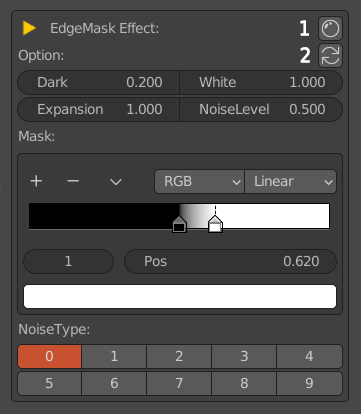
Fig. 33 EdgeMask_Effect panel
1.Open the material editor.
2.Return to the default value.
Dark: Texture black intensity.
White: Texture white intensity.
Expansion: Control the edge effect at the junction of black and white.
NoiseLevel: white noise intensity.
Mask: Controls the threshold value of black and white colors.
NoiseType: EdgeMask Effect with 10 different effects.
Seamless Effect
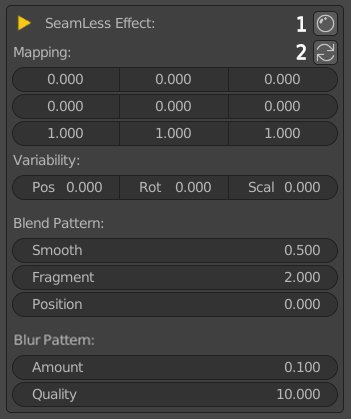
Fig. 34 Seamless Effect panel
1.Open the material editor.
2.Return to the default value.
MMapping: Projection map coordinate values, left to right are X, Y, Z respectively, and top to bottom are position, rotation and scaling respectively.
Variability: Projection map coordinate variation value.
Pos: The positive and negative change value of the position.
Rot: The positive and negative change value of the rotation.
Scal: The positive and negative change value of scaling.
Blend Pattern: Fractal blending texture parameters (change the Variability value to non-zero to have an effect).
Smooth: Fractal texture smoothness.
Fragment: Fractal texture fragmentation.
Position: Fractal texture position.
Blur Pattern: Blur the fractal texture (it will only work after changing the Variability value to non-zero).
Amount: Blurred fractal texture intensity value.
Quality: Blur the fractal texture sample value (the larger the value, the finer it is).
AO Effect
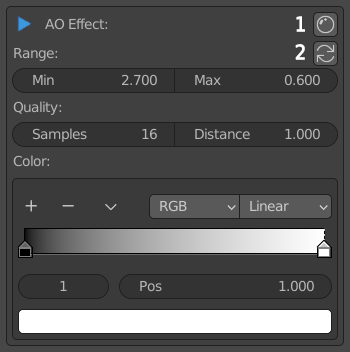
Fig. 35 AO Effect panel
1.Open the material editor.
2.Reset to the default value.
Range: The grayscale range of the AO effect.
Min: The minimum threshold of the AO effect.
Max: The maximum threshold of the AO effect.
Quality: The quality of the AO effect.
Samples: The number of AO effect samples.
Distance: The distance at which other objects are considered to occlude the shading point.
Color: The color gradient corresponding to the AO effect.
Noise Effect
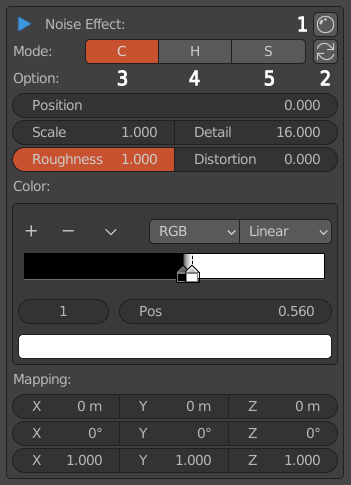
Fig. 36 Noise Effect panel
1.Open the material editor.
2.Return to the default value.
3.Noise texture grayscale value color effect.
4.Noise texture hue value effect.
5.Noise texture saturation value effect. .
Option: Noise parameter option.
Position: The displacement value of the Noise texture.
Scale: The scaling value of the Noise texture.
Detail: The detail value of the Noise texture.
Roughness: The roughness value of the Noise texture.
Distortion: The distortion value of the Noise texture.
Color: The color gradient corresponding to the Noise texture.
Mapping: The translation, rotation, and scaling mapping values corresponding to the Noise texture. The first row is the translation value,
the second row is the rotation value, and the third row is the scaling value.
EdgeWear Effect
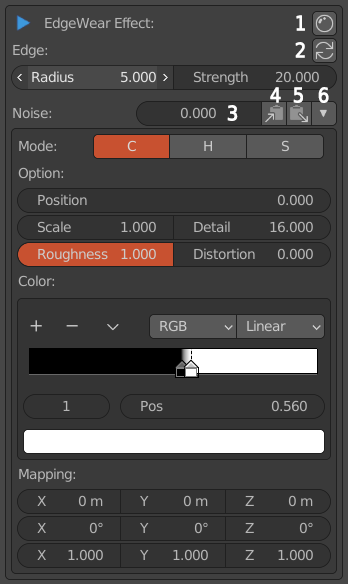
Fig. 37 EdgeWear Effect panel
1.Open the material editor.
2.Return to the default value.
3.Noise texture mask intensity value.
4.Copy the Noise texture parameters to the Noise Effect panel.
5.Copy the texture parameters of the Noise Effect panel to this panel.
6.Noise texture parameter panel storage switch.
Edge:Edge Wear effect edge parameters.
Radius: Edge width.
Strength: Edge strength value.
Noise: Noise texture parameter options, the explanation refers to the Noise Effect panel.
Scratches Effect
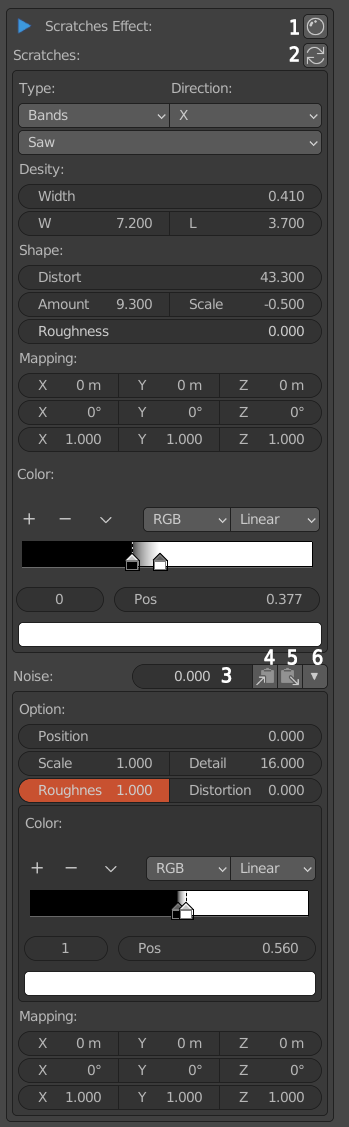
Fig. 38 Scratches Effect panel
1.Open the material editor.
2.Return to the default value.
3.Noise texture mask intensity value.
4.Copy the Noise texture parameters to the Noise Effect panel.
5.Copy the texture parameters of the Noise Effect panel to this panel.
6.Noise texture parameter panel storage switch.
Type: Scratch type and scratch repeat method.
Direction: edge direction.
Desity: Scratch density option.
Width: The scratch width value.
W: Widthwise, the transverse density of scratches.
L: Lengthwise, longitudinal density of scratches.
Shape: Scratch shape options.
Distort: Scratch distortion value.
Amount: Distortion noise value strength.
Scale: Distortion noise scaling.
Roughness: Distortion noise roughness value.
Mapping: The translation, rotation and scaling mapping values corresponding to the scratch texture,
the first row is the translation value, the second row is the rotation value, and the third row is the scaling value. * Color: The color gradient corresponding to the scratch texture. * Noise: Noise texture parameter options, the explanation refers to the Noise Effect panel.